Search Blogs
API Testing with AI in 10 minutes
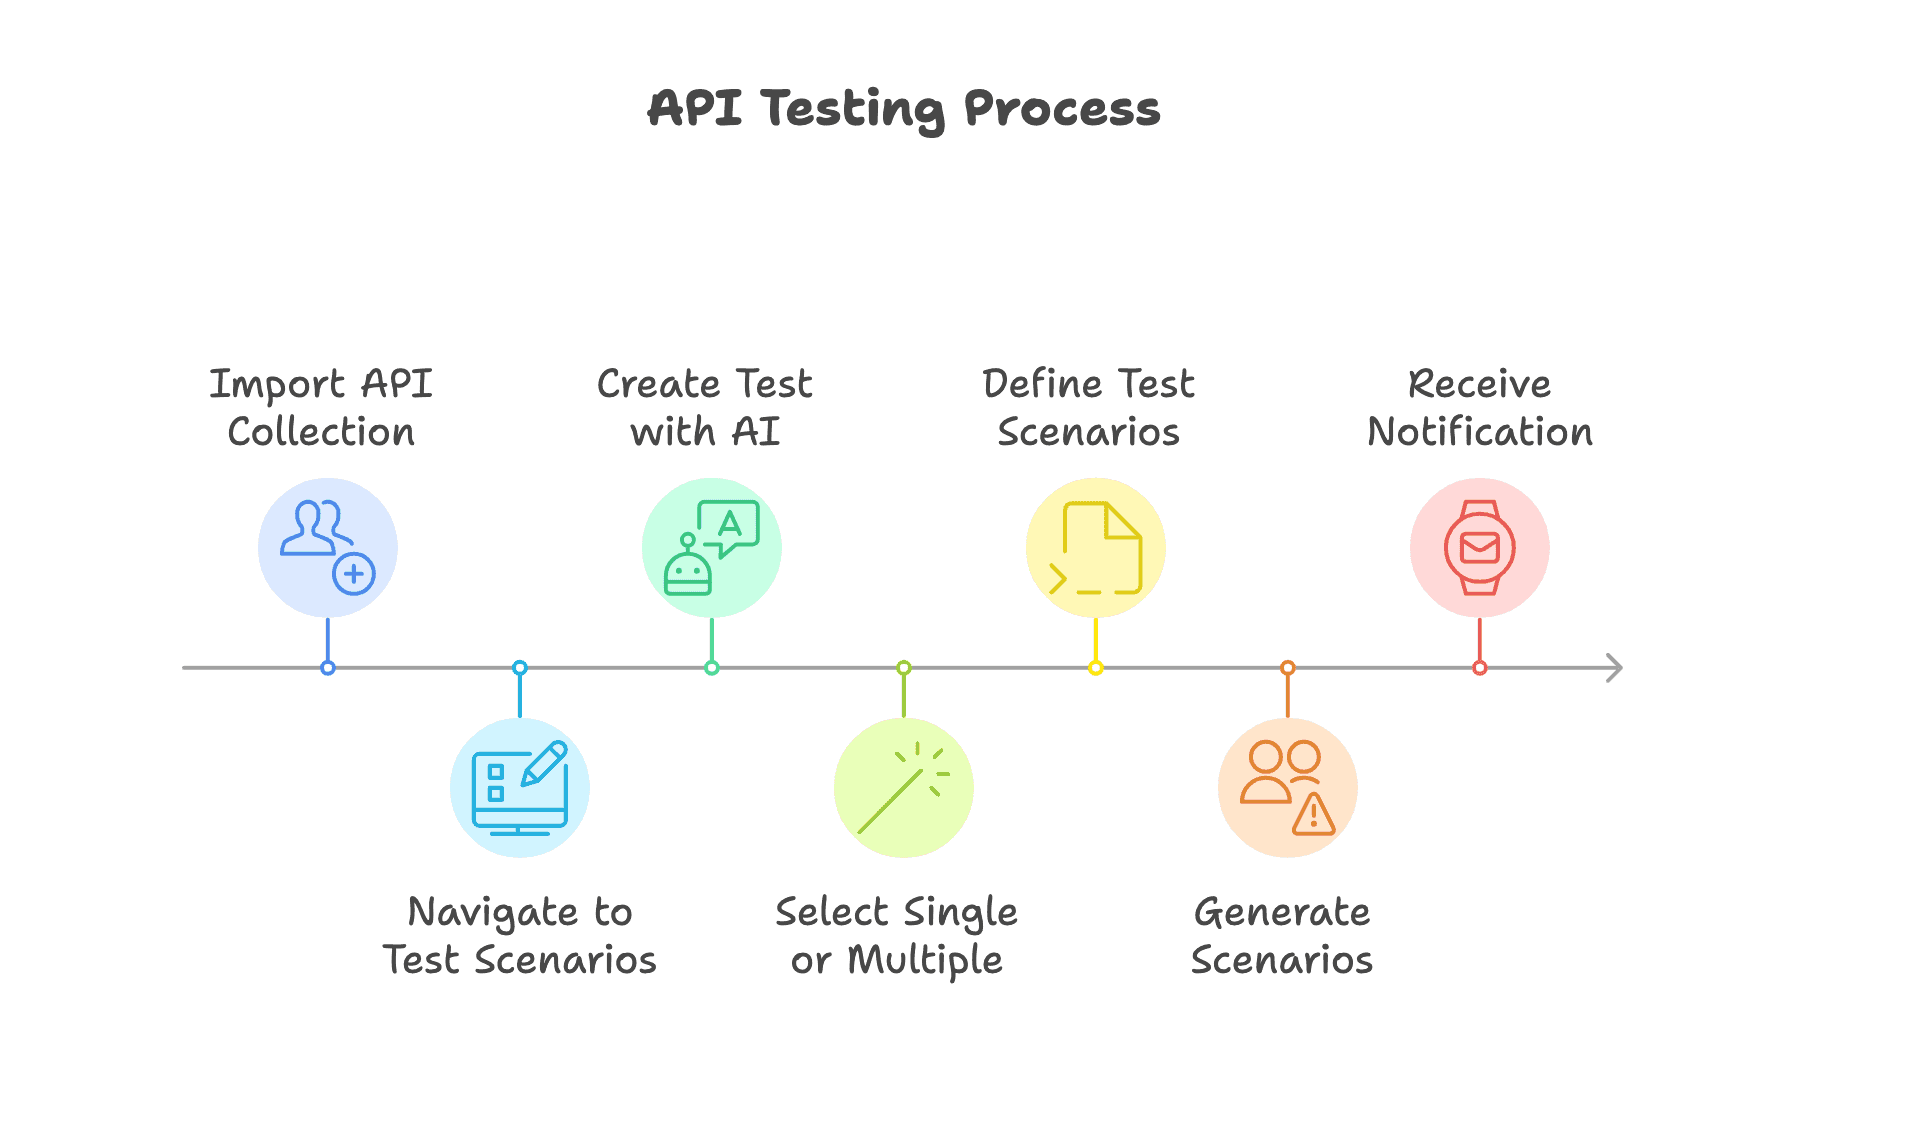
Import your API Collection
Head to the Collections tab, click on ”+” (Add Collection) to add your API collection. You can import collections in the following ways:
Postman Exports: Direct import from Postman
Swagger Exports: Upload swagger.yaml/json files
Export from logs: Use our Rails/Node.js SDKs
Generate Swagger: Use our open-source SDK
Import from Supabase
Create your test with AI
Navigate to the API Testing tab → Test Scenarios, then click Add New Test Scenario → Create with AI to get started.
Create with AI
Our customized AI model analyzes your API collection (imported above) and product doc to generate test scenarios. You can create one scenario or multiple and also review and modify these scenarios as needed.
Single Test Scenario
You can create a single test scenario by following these steps:
Select your collection
Choose the APIs you want to test (all APIs are selected by default)
Describe your test scenario in plain English—the more details, the better!
Scenario creation: Once created, click “Go to Test Scenario”, or simply close the modal. The process will continue in the background, and you’ll receive an email notification when it’s ready.
Activation: The system prepares the request data and marks your test scenario as active.
Human input required? If additional input is needed, the test scenario will be marked with a yellow icon, and you’ll receive a notification to provide the required details.
Managing Test Scenarios:
View and expand test cases for more details.
Modify or add new test cases by clicking ”+ Add New Test Case”.
On the right panel, check details, run tests, and track their status.
Your created test scenario title will appear under Test Scenarios. If you don’t see test cases immediately, they are still being generated—wait for the email notification.
Multiple Test Scenarios
You can create multiple test scenarios by following these steps:
Select your collection – Choose the API collection you want to test.
Choose the APIs – Select the specific APIs for testing. By default, all APIs will be selected.
Define your requirements – Provide the necessary details for your test scenarios.
Select scenario types – Choose from:
Positive – Tests expected behavior.
Negative – Tests how the API handles errors and failures.
Boundary – Tests API limits and edge cases.
Choose test types – Select the type of tests to run:
Unit Tests – Validate individual API endpoints.
Integration Tests – Check interactions between multiple APIs.
Security Tests – Ensure API security and compliance.
Set Unit Test Complexity (Negative Scenarios) – If selecting negative unit test scenarios, you can choose from:
Low – Generates minimal negative test cases.
Medium – Generates a balanced number of test cases.
High – Generates a comprehensive set of negative test cases.
Click “Generate” – The system will automatically create the test scenarios.
What Happens After Test Scenarios Are Created?
Test Data Generation Option – After scenarios are generated, you can choose whether to create test data. This option is provided before execution.
Scenario Processing – The system prepares request data and marks test scenarios as Active once they are ready.
Human Input Required? – If any additional manual input is needed for test data, the scenario will be marked with a yellow icon, and you will receive a notification to provide the required details
Alerts for Missing Request Data – If a test scenario requires manual data input, an orange alert will be displayed stating: “Additional Information Needed: Request data needs to be configured for this test scenario. Please click the ‘Request data’ button to proceed.”
The “Request Data” button allows you to enter missing details.
The test scenario remains inactive until the required data is provided.
Once completed, the scenario can be marked as Active and executed.
Email Notification – You will receive an email alert when test scenarios are fully created.
Managing Test Scenarios:
You can view your created test scenarios under the Test Scenarios page.
Expand test cases to view details.
Modify existing test cases or add new ones by clicking ”+ Add New Test Case”.
The right panel allows you to view test details, execute tests, and check their status.
Your test scenario titles will appear under Test Scenarios. If you don’t see test cases immediately, they are still being generated—wait for the email notification.
Ship bug-free software, 200% faster, in 20% testing budget. No coding required
FAQs
Why should you choose Qodex.ai?
Remommended posts
Hire our AI Software Test Engineer
Qodex instantly connects you with skilled QA engineers, achieving 100% API test automation in days, not months.
Top Blogs
All Rights Reserved
Copyright © 2025 Qodex
Hire our AI Software Test Engineer
Qodex instantly connects you with skilled QA engineers, achieving 100% API test automation in days, not months.
Product
Top Blogs
All Rights Reserved
Copyright © 2025 Qodex
Hire our AI Software Test Engineer
Qodex instantly connects you with skilled QA engineers, achieving 100% API test automation in days, not months.
Product
Top Blogs
All Rights Reserved
Copyright © 2025 Qodex