What are API collections? How to create it
Introduction
Ever felt overwhelmed managing multiple APIs? You're not alone. As businesses increasingly rely on various software applications, keeping track of all those APIs can feel like herding cats. That's where API collections come to the rescue!
Explore out other blogs API Security 101, API Testing in Software Development
Qodex imports Postman collections directly, so an existing collection becomes the starting inventory for automated API testing rather than throwaway work.
What Exactly is an API Collection?
Think of an API collection as a smart filing cabinet for your APIs. It's a way to group related API endpoints that share common access patterns. Instead of having your APIs scattered all over the place, you can neatly organize them into collections. This makes it much easier to manage, monitor, and control access to your APIs.
But there's more: API collections are the backbone of modern teamwork when it comes to building, sharing, and scaling APIs. By grouping endpoints, teams can collaborate on workflows, automation, and even intelligent agents, without losing their minds. Collections help ensure your APIs are integration-ready, making it easier to connect different tools and platforms as your business needs evolve. Top-performing teams use collections to sidestep common pitfalls and bring order to what could otherwise become API chaos.
If you're curious to go deeper, we’ve covered related topics like best practices for writing API documentation, top API testing tools for 2025, and common API testing challenges
But an API collection is more than just neatness for neatness’ sake, it’s a whole toolbox with everything you need bundled together. Here’s what you typically find inside:
Requests:
Easily define and send API requests, fetch data, and test how your endpoints respond, all without needing to write code or open a terminal. Just fill out some details, hit send, and see the response instantly.
Documentation:
Collections often come with built-in, shareable documentation. This means your whole team gets clear, consistent info on parameters, headers, and expected responses, making onboarding and collaboration a breeze.
Variables:
Store and reuse values (like API keys or environment URLs) to save time and reduce errors. Variables let you work smarter, not harder, so you’re not copy-pasting the same info across dozens of requests.
Authorization:
Handle permissions and credentials directly in the collection, applying the right authentication method automatically to each request. That way, you keep your secrets safe and your requests hassle-free.
Tests:
Add tests to your requests to verify that your APIs are returning what you expect. Automate these checks for every update or integration, and get quick feedback if something goes wrong.
Pre-Request Scripts:
Need to set up some data or run custom logic before each call? Pre-request scripts let you automate those tasks, so every request is prepped and polished before it goes out.
With all these features bundled together, an API collection isn’t just organized, it’s powerful, flexible, and designed to make your API life less chaotic and more productive.
How Types in Collections Add Structure and Consistency
Now, you might be wondering, “How do I make sure all these neatly filed APIs actually play nice together?” That’s where types come in.
Types act like detailed blueprints for the information flowing in and out of your APIs. By defining types for things like request bodies, parameters, and headers, you set shared rules everyone in your organization can follow. This means your APIs won’t start inventing their own ways to talk to each other (or to your users), they’ll all speak the same language.
Here’s why that matters:
Consistency: Everyone knows what data to send and expect, whether you’re adding new APIs or tweaking old ones.
Efficiency: Once you define a type, you can use it across all the APIs in your collection, saving time and skipping repetitive setup.
Error Prevention: Spot schema mismatches and potential data snags before they become headaches, think of it as catching a typo before it goes to print.
Clearer Docs: Teams like engineering, QA, or even that one “I just need to grab this data” person from marketing can see exactly what each API expects.
So, by using types, you’re not just organizing your APIs, you’re setting up house rules that keep your whole digital ecosystem running smoothly.
Why Should You Care About API Collections?

Simplified Management: Instead of juggling individual APIs, you can manage them as a group. It's like having all your favorite tools in one toolbox rather than spread across your garage.
Better Access Control: Want to give your sales team access to all Salesforce-related APIs? With collections, you can do that in one go. No more tedious individual permissions.
Improved Visibility: Collections make it easier to see what APIs you have and how they're being used. It's like having a clear map of your API landscape.
Streamlined Documentation: Many platforms (including Workato) offer machine-readable documentation for entire collections. This means easier integration for developers and fewer headaches for everyone.
Plus, with the introduction of reusable data models, think standardized types for parameters, headers, and body schemas, your documentation isn't just accessible, it's clear and consistent across the board. By enriching your collections with these data models, developers can quickly understand exactly what’s expected in every request and response, leading to smoother collaboration and less time spent deciphering API quirks.
Plus, thanks to the use of reusable data models (often called "types" within collections), your documentation gains an extra layer of clarity and consistency. These types help standardize parameters, headers, and body schemas across requests and responses, making it much simpler for teams to understand, maintain, and extend your APIs without second-guessing the details.Optimized Performance: By grouping similar APIs, you can apply optimizations across the board, potentially improving response times and reducing costs.
Bringing Consistency with Defined Types
So, how do you keep things tidy and avoid repeating yourself? By defining types within your API collections! Defining types, think templates for things like request bodies, headers, or parameters, means you set the rules once and then reuse them across all your APIs in the collection. This helps in a few ways:Consistency: Everyone on your team uses the same data structure, so there's less room for those "it worked on my machine" surprises.
Less Duplication: Rather than rewriting the same schema for every endpoint, you just reference your defined type. One update changes it everywhere.
Fewer Errors: Catch mismatches or missing fields early, since types act like a checklist for what data should look like.
Whether you're building from scratch or tweaking as you go, having clear types in your collection is like having a standard recipe that everyone follows, reliable results, fewer mistakes, and way less time spent hunting down tiny inconsistencies.
In the world of modern software development and integration, API collections are your secret weapon for keeping things organized, secure, and efficient. They're not just a nice-to-have – they're becoming essential for businesses that want to stay agile and competitive.
What Do the Pros Think? Real-World Benefits of API Collections
But don’t just take my word for it, seasoned developers and industry leaders widely endorse the power of API collections for a reason. Across companies big and small, the consensus is clear: API collections make sharing, onboarding, and teamwork much smoother.
Accelerate Developer Onboarding: Instead of slogging through documentation or deciphering code, developers can dive right in using well-organized API collections. This means faster project kickoffs and fewer bottlenecks.
Effortless Collaboration: When teams need to work together, whether they’re in the same office or halfway around the world, collections provide a single source of truth. Everyone stays on the same page, reducing confusion and wasted effort.
Keep Everyone in Sync: Want to ensure the latest update or new feature is instantly accessible? API collections let teams quickly distribute changes, so every developer, partner, or stakeholder has what they need at their fingertips.
In short, whether you’re streamlining internal workflows at a startup or enabling seamless partner integrations at a global enterprise, API collections are the unsung heroes keeping your API development running smoothly.
Types of API Collections: Finding Your Perfect Match
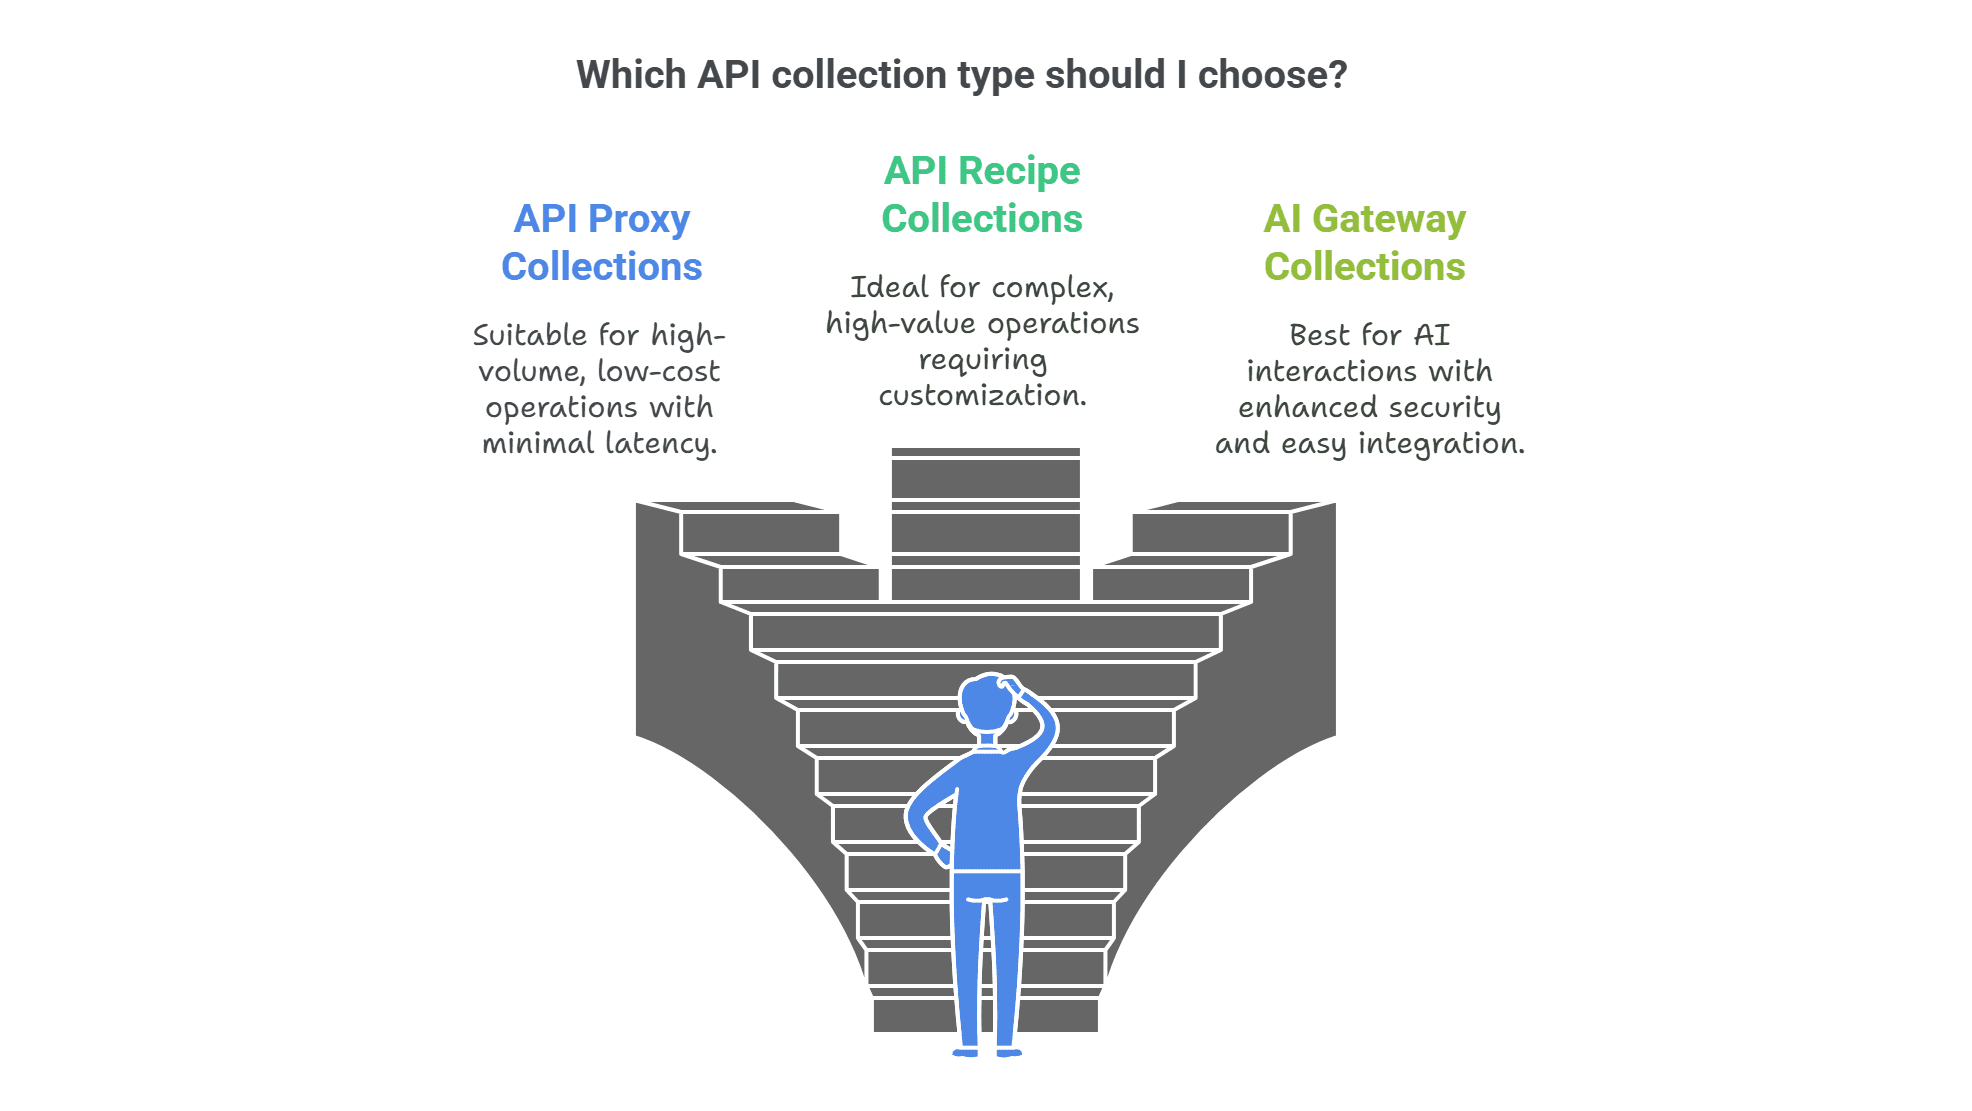
Not all API collections are created equal. In fact, there are three main types, each with its own superpowers. Let's break them down in simple terms:
API Proxy Collections
Imagine a bouncer at a club. That's what an API proxy collection does for your APIs. It stands between the outside world and your backend, forwarding requests but adding an extra layer of security and control.
Key Features:
Acts as a go-between for API requests
Great for high-volume, low-cost operations
Minimal latency and no concurrency limits
Limited customization options
2. API Recipe Collections
Think of these as your personal API chefs. They don't just pass along requests; they can whip up custom responses based on your specific needs. Need to grab data from multiple sources, mix it up, and serve a unique result? API recipe collections have got you covered.
Key Features:
Build your custom API backend
Ideal for complex, high-value operations
More flexible but with some concurrency limits
Highly customizable
3. AI Gateway Collections
These are the new kids on the block, designed to play nice with AI. If you're working with language models or other AI tools, AI gateway collections help them interact safely and effectively with your APIs.
Key Features:
Specialized for AI interactions
Enhanced security for AI-based requests
Easy integration with AI tools and platforms
Structuring APIs for Workflows and Intelligent Agents
So, how do you make sure your APIs can truly supercharge workflows and play nicely with smart agents (think: Zapier bots, Slack integrations, or AI like ChatGPT)? The secret sauce is in the structure, and a clever protocol or two.
By organizing your APIs into collections and using modern standards like the Model Context Protocol (MCP), you create a consistent, integration-ready environment. That means any tool, from automation platforms to ambitious AI, can find, understand, and use your endpoints without getting lost in translation.
Here’s how you set things up for success:
Consistent Naming and Grouping: Stick to predictable patterns when naming and grouping your endpoints. Imagine labeling everything in your garage so anyone could find the drill bits.
Standardized Data Formats: Use friendly, industry-standard formats (JSON, REST, or OpenAPI) to ensure everything “just works” together, no handshake mismatches.
Machine-Readable Documentation: Protocols like MCP let intelligent agents instantly learn what an endpoint does, what data it needs, and how to use it.
Clear Access Controls: Organize your API collections so each workflow or smart assistant only sees what it’s supposed to, keeping things both tidy and secure.
Automation-Ready Interfaces: Make sure your APIs are built to be triggered by workflows, schedule-based tools, or even event-driven logic, unlocking a world of hands-free possibilities.
Structuring your APIs this way doesn’t just prevent chaos, it actually invites innovation. When workflows and intelligent agents can intuitively navigate your API landscape, you empower teams to automate faster, experiment boldly, and rescue their productivity from a sea of tangled endpoints.
Handy Templates to Jump-Start Your API Journey
When it comes to building, documenting, and testing your APIs, you don’t have to start from scratch. There’s a whole buffet of ready-made templates out there, each designed to make your life easier at every stage:
Design Templates: Perfect for laying out your API structure before a single line of code is written. Whether you’re aiming for REST, GraphQL, or even SOAP, there’s a template that fits your needs.
Documentation Blueprints: Skip the tedious formatting, use templates to quickly generate clear and standardized API docs that help your team (and future-you) understand what’s going on.
Development Kickstarters: Get your endpoints up and running faster with frameworks and starter packs, ready for popular stacks like Node.js, Python (Django/Flask), or Java (Spring Boot).
Testing Scenarios: Choose from pre-built scripts and scenarios to test everything from authentication to error handling, whether you’re using tools like Newman, Insomnia, or Postman.
Workflow Templates: Set up continuous integration and deployment pipelines, automate versioning, or streamline security checks, all with just a few clicks.
These templates are not just time-savers, they’re your shortcut to best practices, helping you avoid reinventing the wheel and focus on what truly matters: building great APIs.
Choosing the Right Collection Type: A Simple Guide
Now that you know the players, how do you pick the right one for your team? Here's a straightforward guide to help you decide:
Factors to Consider:
Performance Needs: How fast do you need responses? How many requests are you handling?
Customization Requirements: Do you need simple forwarding or complex data manipulation?
Security Concerns: Are you dealing with sensitive data or AI interactions?
Development Resources: Do you have the time and skills to build custom API recipes?
Integration Targets: Are you connecting with AI tools, human users, or other systems?
Use Cases for Each Type:
API Proxy Collections:
Securing access to internal APIs
Managing high-volume, straightforward API traffic
Adding monitoring to existing APIs without changing their behavior
API Recipe Collections:
Creating custom APIs that combine data from multiple sources
Implementing complex business logic in your API responses
Building APIs for specific departments or projects with unique needs
AI Gateway Collections:
Allowing AI models to interact safely with your business systems
Creating APIs specifically for AI-powered applications
Ensuring security and control over AI-based integrations
Remember, there's no one-size-fits-all solution. Many organizations use a mix of collection types to meet different needs. The key is understanding your requirements and choosing the collection type that best fits each scenario.
By selecting the right API collection type, you're setting yourself up for smoother operations, better performance, and happier developers and users. So take a moment to consider your needs – your future self will thank you!
Pro Tips: Dodging API Chaos Like a Pro
Ever wonder how the top teams sidestep the usual API headaches and keep everything humming along smoothly? The secret sauce is collaboration, clear standards, and a sprinkle of automation. Here’s how they do it (and how you can, too):
Set Clear API Contracts: Leading teams use frameworks like OpenAPI or Swagger to design contracts everyone agrees on from day one. This keeps developers, partners, and even future-you on the same page, no last-minute surprises.
Automate the Boring Stuff: Don’t rely on manual testing or documentation. Tools like Stoplight and SwaggerHub auto-generate docs and catch breakages early, saving hours (and headaches) down the line.
Version Your APIs Relentlessly: Regularly update and version your endpoints (think v1, v2, etc.), just like Netflix or Stripe. This lets you roll out new features or fixes without breaking existing integrations.
Monitor and Test Continuously: Top teams integrate automated testing (hello, Jenkins and CircleCI) and real-time monitoring (shoutout to Datadog and New Relic) to spot issues before users ever notice.
Foster Open Communication: Great API teams document relentlessly, share learnings, and run regular reviews to prevent small misunderstandings from turning into big integration disasters.
The result? Fewer fire drills, smoother launches, and APIs that are always ready for action, no duct tape or crossed fingers required.
Getting Started with API Testing
Before you dash off to build your next big integration, it’s a good idea to make sure your APIs are actually doing what you expect. Enter: API testing! Let’s break down the basics and show you how to write your first simple API tests, no sweat required.
Why Test Your API?
APIs are like backstage passes for your apps, they need to be reliable, secure, and fast. A few solid tests can help you:
Verify that each endpoint returns the correct data
Catch issues before your users do
Ensure changes or updates don’t break what was already working
Core Concepts You’ll Use
When you’re testing an API, you’ll be sending requests (like GET, POST, PUT, DELETE) and checking the responses. Here’s what to look for:
Status Codes: Make sure your API is returning the right HTTP status codes (200 for success, 404 for missing resources, 500 for server errors, etc.).
Response Body: Check if the data you get back matches what you expect. For example, does a “GET /users” return a list of users with the right fields?
Headers: Some APIs require or return important headers. Don’t forget to test those too.
Performance: How fast is your API? Quick responses keep users (and devs) happy.
How to Write a Basic API Test
Choose Your Tool: There are a variety of platforms like Hoppscotch, Insomnia, or even good old curl if you like the command line.
Create a Request: Set up your request with the method, URL, headers, and (if needed) body.
Send the Request: Fire away and capture the response.
Set Up Checks:
Compare the status code to what you expect (like 200 OK).
Look at the JSON or XML response and check for required properties.
Confirm headers like “Content-Type” or authentication tokens are present.
Here's a quick pseudo-example for inspiration:
Repeat for each endpoint you want to test. As your API grows, you can add more complex checks for edge cases, error responses, and even security-related scenarios.
Testing doesn't need to be fancy, a handful of focused tests can save hours of future debugging. Now that you’ve built your collection, you’re ready to trust it with real-world traffic, confident that the basics are covered.
The Basics of REST APIs (and How to Test Them)
Before you can organize your APIs, it's helpful to understand what REST APIs are and how you make sure they're doing what they're supposed to.
REST API 101
At its core, a REST (Representational State Transfer) API is like a smart waiter for digital data. You ask for information (like, “Hey Spotify, what are my playlists?”) and the API serves up exactly what you ordered in a standard format, usually JSON or XML. REST works over HTTP, using simple requests like GET (fetch data), POST (send new data), PUT/PATCH (update info), and DELETE (say goodbye to something).
Testing REST APIs Without Losing Your Mind
So, how do you know these requests are working and your waiter isn't mixing up your order? That’s where testing comes in:
Manual Testing: Use tools like curl (in your terminal), HTTPie, or dedicated API clients (e.g., Insomnia) to send real requests and see the actual response.
Automated Testing: Write scripts in languages such as JavaScript, Python (look up the
requestslibrary!), or even shell scripts to automate the process of poking and prodding your API.Documentation for the Win: Clearly written docs aren’t just helpful, they’re crucial. Good documentation explains which endpoints exist, which requests they accept, and what responses to expect.
By mastering these basics, you'll be set up not just to wrangle your APIs, but to keep them running smoothly and reliably.
How to Uncover API Bottlenecks with Performance Testing
So, you’ve picked your collection type and the gears are turning. But how do you make sure your shiny new APIs can handle the heat when traffic spikes? That's where performance testing comes in, a crucial step for any team that wants their API to hum along smoothly, even under pressure.
Here's how to roll up your sleeves and get started:
Simulate Real-World Traffic: Use tools like JMeter or Gatling to generate a variety of requests, including bursts that mimic peak usage. This will help you see where your APIs might start to sweat.
Monitor Response Times: Keep a close eye on how quickly your APIs respond. Spikes in latency can reveal when and where bottlenecks occur.
Check Throughput and Error Rates: Pay attention to metrics like requests per second and the percentage of failed requests. A sudden jump in error rates often points to points of failure under heavy load.
Profile Resource Usage: Track server CPU, memory, and network utilization throughout your tests. Bottlenecks often show up as resource exhaustion in one particular area.
Analyze Logs for Patterns: Dig into request and error logs for clues, sometimes a certain endpoint or data size consistently slows things down.
By combining these steps, you can spot weak points before they turn into outages. Addressing bottlenecks early keeps your APIs robust, reliable, and ready for whatever your users throw at them.
Variables: Your Secret Sauce for Efficient, Readable API Workflows
Let’s talk about variables, the behind-the-scenes MVPs of any API workflow. Think of variables as little containers that hold values (like URLs, credentials, or even temporary data) so you don’t have to type things out a dozen times or risk a copy-paste catastrophe. By plugging variables into your API requests, you can update values in one shot and watch your changes ripple everywhere they’re used. No more hunting for stray URLs or outdated keys hidden deep in your requests.
Why Variables Matter
Boost Efficiency: Tired of editing the same value in multiple spots? With variables, you tweak it once, and you're done. Perfect for switching between staging and production, or juggling multiple environments (think secure access tokens for dev, QA, and prod).
Increase Readability: Variables make your workflows tidy and understandable. Instead of wading through hard-to-read requests packed with random strings, you see clear placeholders that say exactly what's being used.
Scope for Flexibility: Need variables specific to a user, a project, or an environment? Variables can flex to fit your needs, keeping things organized whether you’re running quick tests solo or collaborating with a team.
In short, variables help you build cleaner, smarter API workflows, saving you time, reducing errors, and making your requests easier for teammates to understand.
Creating an API Collection: Your Step-by-Step Guide
Ready to create your first API collection? Don't worry, it's easier than you might think! Let's walk through the process together, step by step.
Prerequisites
Before we dive in, make sure you have:
A Workato account with access to the API Platform
A project created (or an existing one you want to use)
For API recipe collections: A folder with one or more API recipes
For API proxy collections: An HTTP connection to forward requests
Got all that? Great! Let's get started.
Step-by-Step Guide
1. Accessing the API Collections Page
First things first, let's navigate to where the magic happens:
Log into your Workato account
Go to the Platform menu
Click on API Platform
Select API Collections
You're now on the API collections page. This is where all your collections will live.
2. Selecting Collection Type
Time to choose your flavor:
Click on the "New Collection" button
You'll see three options: API Proxy Collection, API Recipe Collection, or AI Gateway Collection
Select the type that fits your needs (remember our discussion on types from earlier?
Configuring Endpoints
Now for the fun part - setting up your endpoints:
For API Proxy Collections:
Choose an HTTP connection to forward requests to
Select a configuration type (Import OpenAPI Spec or Manual)
If importing, upload your OpenAPI file or enter a URL
Select the endpoints you want to include
For API Recipe Collections:
Choose to use existing recipes or import an OpenAPI Spec
If using recipes, select the folder containing your API recipes
If importing, upload your OpenAPI file or enter a URL
Customize your endpoints as needed
For AI Gateway Collections:
Choose to use existing recipes or import an OpenAPI Spec
Follow the same steps as API Recipe Collections for your chosen method
Pro Tip: When customizing endpoints, pay attention to the endpoint name, path, and HTTP method. These are crucial for how your API will be accessed.
Creating and Testing Requests, No Code Needed
You might be wondering: “Do I need to write scripts or use the command line to interact with my APIs?” Good news, absolutely not! Modern API platforms make it easy for anyone to create, send, and test requests without a single line of code.
Here’s how it works:
Use a visual interface to build your API requests by choosing the request type (like GET or POST), filling in any necessary parameters or headers, and defining the endpoint path, just point, click, and type.
Hit “Send” (or your platform’s equivalent), and the response from your data source appears instantly in the workspace.
You can tweak settings, view results, and experiment with different inputs, all from your browser. No terminal gymnastics required.
This user-friendly approach means you can validate endpoints, explore data, and see how your APIs behave, whether you’re a seasoned developer or just getting your feet wet.
5. Setting Collection Details
Almost there! Let's give your collection an identity:
Enter a name for your collection (make it descriptive!)
Assign a version (this helps with managing updates later)
Add a description (optional, but helpful for your team)
Select the project this collection belongs to
6. Activating Endpoints
The final touch - bringing your endpoints to life:
After creating your collection, you'll see an overview of all endpoints
By default, new endpoints are inactive
To activate an endpoint, simply toggle the "Inactive" button to "Active"
Repeat for all endpoints you want to make available
And voilà! You've just created your very own API collection. Pat yourself on the back – you're now an API organization pro!
Remember, creating a collection is just the beginning. Don't forget to manage access, monitor usage, and keep your collection updated as your needs evolve.
Authorization Made Simple
Before you open your API doors to the world, you'll want to make sure only the right folks get in. That’s where authorization comes in! APIs support a variety of authorization methods, each designed to keep your data secure while making life easier for legitimate users.
Here’s a quick rundown of the most common API authorization methods, plus how to set them up in minutes:
API Keys: This is the classic, just generate a unique key for each user or application. Then pop that key into a request header or parameter and you’re all set. Many platforms, like Stripe or Google Maps, rely on this super simple approach.
OAuth 2.0: When you want fine-grained, delegated access (think: “Log in with Google” buttons), OAuth 2.0 is your friend. Set it up by registering your application with the provider (like Microsoft or GitHub), grab your client ID and secret, and follow their quick-start wizard to get tokens for user access.
Bearer Tokens: Think of these as digital hall passes. Once a user logs in (often via OAuth2), they’re issued a token, which they include in the Authorization header of API calls. This method is robust and flexible, great for modern web apps.
Basic Auth: For quick-and-dirty security (and for internal tools or testing), this method encodes a username and password in the request header. Just remember, it’s best paired with HTTPS for safety.
Client Certificates: For extra-tight security, some APIs use client SSL certificates. Here you’ll need to generate, install, and manage certs for each approved user or device.
Custom Solutions: Some APIs roll out their own methods, using custom tokens, signed requests, or even HMAC signatures. Always check the docs for specifics!
Quick Tip: Save yourself from credential headaches by using environment variables or secret management tools whenever possible, this keeps passwords and keys out of your codebase and helps your team collaborate securely.
No matter which method you choose, setting up authorization usually boils down to: selecting your preferred method, entering a few details (like keys or credentials), and verifying the connection, often as simple as filling a form or toggling an option.
Managing and Reusing Authorization Details
Let’s talk about handling authorization, because scrambling for API keys every time you make a request is no one’s idea of fun.
Rather than entering credentials for each endpoint, you can streamline the process by centralizing your authorization settings within your API collection. Here’s how to make it painless (and secure):
Set Authorization at the Collection Level: Define your preferred authentication method (like OAuth, API key, or JWT) directly in your collection’s settings. This way, all endpoints within that collection inherit these details automatically.
Leverage Environment Variables: Store sensitive information (such as tokens, credentials, or secrets) in environment variables. This approach keeps your actual credentials from being hard-coded in requests and makes switching between dev, staging, and production environments a breeze.
Customize When Needed: If an individual endpoint requires a different authorization method or specific credentials, you can override the collection settings just for that endpoint.
Keep It Safe and Efficient: By managing authorization in one place and reusing variables, you reduce the risk of mistakes, eliminate repetitive entry, and improve team collaboration.
This setup not only saves time but also helps keep your API requests consistent and secure as your project grows. Next up: managing your new API collection like a champ and unlocking even more features!
Crafting API Documentation with Markdown
Now that your endpoints are live, it's time to make them shine with clear documentation. Markdown is your best friend here, it lets you create clean, readable documentation without fuss, so your developers (and your future self) will thank you.
Why Use Markdown?
Easy Formatting: Markdown makes it simple to add headers, lists, code blocks, and even tables, perfect for structuring endpoint details and usage examples.
Live Examples: Drop in request/response examples or curl commands to show how your API works in practice.
Quick Edits: Change details on the fly, no complicated formatting tools required.
Rich Readability: The result is documentation that's both easy to read and visually organized.
How to Use It
When writing your API documentation, consider these essentials:
Add a high-level introduction at the top so readers know what they're working with.
List endpoints using Markdown headers and bullet points.
For each endpoint, include method, path, parameters, and authentication requirements.
Use code blocks for example requests and responses, like so:
Highlight optional and required fields clearly using bold or italics.
Pro Tip: Tools like GitHub, GitLab, and Bitbucket render Markdown beautifully, so your docs look polished wherever they're shared.
Clear, friendly documentation means fewer headaches and smoother integrations. Take the time to make your docs welcoming and easy to follow, your team (and your users) will be glad you did!
Generating Sample Test Data
Need to put your shiny new API collection through its paces? Generating realistic test data is key for troubleshooting, validation, and simulating real-world use cases, without any risk to your production systems.
Here are a few handy ways to create fake test data for your APIs:
Online Data Generators: Free tools like Mockaroo and RandomUser.me let you create a variety of datasets on demand, from user profiles to custom records. Simply specify the fields and formats you need, then download or pipe them directly into your tests.
Open Source Libraries: If you prefer to keep things scriptable, libraries such as Faker (available for Python, JavaScript, and more) and Chance.js make it easy to generate random data within your test scripts or recipes.
Custom Scripts: Feeling adventurous? You can always write your own logic to build test data tailored to your business logic (great for complex, structured data).
Pro Tip: Using fabricated data not only protects real user information but also helps ensure your API behaves consistently, even under unusual or edge-case scenarios.
Armed with a stash of fake data, you’re ready to run comprehensive tests and catch tricky bugs before they ever reach production.
Understanding Variables: Boosting Reusability and Efficiency
Ever wish you could save time (and a few headaches) when building or testing your APIs? That’s where variables shine. Variables let you store values, like API keys, environment URLs, or input data, in one place, so you don’t have to manually enter them all over your requests. It's a bit like letting your favorite coffee shop remember your order, so you can just say “the usual” and get moving.
Here’s why variables are a game-changer for your workflow:
No More Repetitive Typing: Set a value once, like your dev server’s base URL or a token, and reference it everywhere. Need to switch environments? Just update the variable, and you’re golden.
Cleaner, More Understandable Requests: Instead of cryptic URLs or credentials scattered throughout your setup, you’ll see clear placeholders. This makes your requests easier to read and share with teammates.
Flexible Testing and Collaboration: Variables adapt to whatever you’re working on, letting you switch between test, staging, and production setups in a snap. It also helps your whole team stay on the same page.
Whether you’re juggling sandbox and production endpoints, or updating a password across multiple places, variables keep things tidy, efficient, and much less error-prone. Your future self, and your teammates, will thank you!
Performance Testing: Stress-Testing Your APIs Like a Pro
Wondering if your APIs can handle real-world traffic? It’s time to put them to the test! Performance testing helps you spot slowdowns, bottlenecks, and other gremlins before your users ever notice.
Here's how to get started:
Choose a performance testing tool (like JMeter, k6, or Artillery) that fits your needs.
Set up scenarios that mimic typical and peak user traffic.
Run your tests and monitor key metrics: response time, throughput, and error rates.
Analyze the results to pinpoint slow endpoints or potential trouble spots.
Pro Tip: Schedule regular performance tests, especially after major changes, to keep your APIs speedy and reliable for everyone.
Regression Testing: Safeguarding Your API's Reliability
So, what exactly is regression testing, and why should you care? In simple terms, regression testing helps you make sure that your API still behaves as expected after you've made updates, bug fixes, or added shiny new features. Think of it as a safety net: every time you tweak something, you run automated tests to catch any accidental breakage before your users do.
In practice, this means:
Double-checking existing endpoints to ensure nothing broke in the process
Validating that previous integrations and workflows remain intact
Confirming that new changes haven’t triggered any sneaky issues elsewhere
Bottom line: regression testing gives you the peace of mind that your improvements won’t come with unwanted side effects. With regular testing in place, your API collections remain robust, dependable, and future-proof as your projects grow.
What is Integration Testing for APIs?
Imagine you’ve finished organizing your APIs into collections, fantastic! But how do you know all these individual pieces actually play well together? That’s where integration testing steps in.
Integration testing is a way to ensure that different APIs, or different parts of a single API, work together seamlessly when combined. Rather than just checking if one endpoint does its job in isolation, integration tests look at how everything interacts as a whole. For example, if your login API talks to your user profile API, integration testing helps confirm that the entire flow, from authentication to retrieving user data, runs smoothly, just as you’d expect.
At its core, integration testing lets you:
Catch issues where APIs depend on each other, such as mismatched data formats or timing problems.
Confirm that responses remain consistent across the workflow, so you’re not left with nasty surprises in production.
Simulate real-world scenarios using tools like Postman, SoapUI, or JMeter, giving you peace of mind before your APIs go live.
In short, integration testing acts as the dress rehearsal for your APIs, ensuring everything functions harmoniously, sparing you from last-minute chaos down the road.
Kick-Start Your API Journey with Ready-Made Templates
Not sure where to begin with your API project? Good news, you don't have to start from scratch! There’s a treasure trove of over 70 free, customizable templates covering every stage of the API lifecycle. Whether you’re sketching out a brand-new design, crafting clear documentation, building endpoints, or setting up automated tests, you’ll find templates tailor-made to fit your workflow.
What Can You Find?
Design Blueprints: Wire up your first endpoint in minutes with design patterns modeled after industry best practices from giants like Spotify, Stripe, and Twilio.
Documentation Frameworks: Easily structure your API docs for clarity, consistency, and developer happiness, think clear examples, usage notes, and error codes all set up for you.
Development Starters: Pre-built collections that help you quickly scaffold routes, authentication, data validation, and even common integrations with platforms like Salesforce or Slack.
Testing Playbooks: Out-of-the-box templates for functional, load, and security testing, inspired by real-world workflows at leading tech companies.
Simply pick a template that fits your needs, customize it to match your requirements, and you’ll save hours of busywork, not to mention sidestepping rookie mistakes along the way.
Now that you’ve got a jump start with templates, let’s roll up our sleeves and create your first API collection.
Forking Collections: Collaborate and Experiment Without Risk
Ever wanted to try out new ideas or experiment with API changes, without fear of breaking the original collection? That’s where forking comes in. Forking lets you create an independent copy of an existing collection. You’re free to explore, add new endpoints, or tweak configurations in your forked version, all while the original collection stays safe and unchanged.
Forks are perfect for:
Testing new features without disrupting production
Collaborating with teammates on parallel development
Suggesting improvements or changes for review
When your updates are polished and ready, you can simply merge your changes back into the original collection, no mess, no stress. This workflow keeps things organized and encourages safe, efficient collaboration across your team.
Moving Collections: Seamless Collaboration Across Workspaces
Need to shift your collection to another workspace for better collaboration or to support a different team? No problem! Here’s how to make it happen:
Head to your API Platform and locate the collection you want to move.
Click into the collection, then look for the "Move" option, usually found in the collection menu or settings.
Select the destination workspace from the list of available options.
Confirm the move.
This quick transfer is ideal when you want to share your collections with your team, set them up in a dedicated workspace, or simply reorganize your growing list of APIs. It’s especially handy for making collections accessible to new groups, whether you’re bringing recipes over to a new project or collaborating with external partners in your organization’s Private API Network.
Pro Tip: Double-check permissions in the new workspace to ensure the right people have access to your moved collection.
Running Collections with Data Files: Test Like a Pro
Need to put your APIs through their paces with different inputs, without endless, tedious manual tweaking? Enter data files! With a CSV or JSON file, you can run your entire API collection against dozens (or hundreds) of scenarios in one go.
Here’s how to bulk-test your APIs with data files:
Prepare your data file, typically in CSV or JSON format. Each row (CSV) or object (JSON) represents a separate test case with its own set of variables.
In your API testing platform of choice (like Postman or Insomnia), look for the option to run a collection or workflow with a data file.
Upload your file and start the collection run. Each iteration pulls values from a row/object in your data file, plugging them into your requests automatically.
Review the results after the run finishes, spot trends, identify edge cases, and catch issues you might otherwise miss.
This approach is a lifesaver for validating how your APIs handle a ton of scenarios, from varied customer data to edge case values, without having to manually change each input. It’s automation, but with extra swagger!
Sending API Requests, No Coding Required
Ready to interact with your APIs but not up for writing a single line of code? Good news: many modern API platforms let you define and send API requests through intuitive interfaces. Instead of dusting off your command line skills, you can simply fill out a request form, plug in your parameters, and click "Send", all from your browser or a desktop app.
Here’s how it typically works:
Select the API endpoint you want from your organized collection.
Enter any required inputs (like authentication keys or query parameters).
Hit "Send" and watch the response appear instantly, no scripts or terminal windows needed.
Platforms like Qodex, Postman, and Insomnia have made it a breeze to test, tweak, and troubleshoot your APIs visually. This makes it easy for non-developers and developers alike to interact with APIs, experiment with new workflows, or simply confirm everything’s running smoothly.
With just a couple of clicks, you can see exactly what your API is returning and make adjustments on the fly, no coding chops required.
Scenario Testing with Data Sets
Curious how to put your API collection through its paces? Enter scenario testing. This approach lets you loop through multiple data points, think customer records, product IDs, order numbers, and automatically trigger workflows for each one, making it easy to simulate real-world usage.
Here’s how you can get started:
Prepare a Data Set: Gather your test data into a spreadsheet or CSV file, with each row representing a scenario you want to test.
Configure the Workflow: Set up your workflow or automation to accept inputs from this data set. For example, if you’re testing order creation, each row might represent a unique order.
Run Iterative Tests: Use your automation tool’s bulk-execution or batch-processing feature (many platforms like Zapier, Microsoft Power Automate, or Workato offer this). The workflow will iterate through the list, firing off test calls for each data entry.
Monitor Responses: Watch the responses roll in. Pay attention to success and failure cases, proactively spotting bugs or inconsistencies before your users do.
This method is especially handy for stress-testing, regression checks, or confirming that new updates don’t accidentally break your existing logic. By combining datasets with automated workflows, you ensure your APIs are battle-tested and ready for anything your users might throw at them.
Setting Up Authorization Methods
Let’s make sure your APIs stay secure and easy to use. There are several popular ways to handle authorization, and setting them up is pretty straightforward. Here’s a quick overview of your options and how to get started:
Common Authorization Methods:
API Key – Just add a unique key to your header or query. Perfect for quick, lightweight projects.
Basic Auth – Use a simple username and password combo. Great for internal tools or systems without complex security needs.
OAuth 2.0 – The gold standard for secure, delegated access. Set up your client ID, secret, and scopes to safely connect with services like Google, Microsoft, or Salesforce.
Bearer Token – Often used with OAuth 2.0 flows, you’ll pass a token in your Authorization header.
Custom Schemes – Some APIs want something special in their headers or payloads. Just follow their specific setup instructions.
How to set them up:
Choose your authorization type based on your API or application needs.
Add credentials securely, use environment variables or collection-level settings to avoid exposing secrets.
For advanced methods like OAuth, you’ll typically need to register your app with the provider and grab required details like client IDs and redirect URIs.
Test your configuration to make sure your requests are properly authenticated.
Pro Tip: Keep sensitive credentials out of plain sight by always using variables and secure folders.
That’s all there is to it, pick your method, plug in your details, and your endpoints are now both protected and ready to use!
Managing Authorization: Streamlining Secure Access
Controlling access to your APIs is key to keeping your data safe and workflows humming. To handle authorization details efficiently, and without the headache, centralize your credentials using variables within your API collection or project. This way, you can update tokens, keys, or credentials in one spot, keeping them consistent and out of harm’s way.
For even more security, use environment variables or secrets management features provided by your platform. These options let you share collections with teammates without ever exposing sensitive info directly. Whenever an API call is made, the system pulls in the correct authorization details automatically, ensuring every request is both secure and seamless.
Pro Tip: Regularly review and update your credentials, and only grant as much access as necessary. Think of it as giving out front door keys, only hand them over to those who really need them!
Making Your APIs Integration-Ready with Modern Protocols
So, where does support for protocols like the Model Context Protocol (MCP) fit into all of this? Think of MCP as a universal translator for your APIs. By adopting standardized protocols, your APIs instantly become more approachable for automation tools, integration platforms, and even the latest AI models, kind of like adding a magnetic label to every drawer in your filing cabinet, so anyone can find exactly what they need at a glance.
How does this help you?
Plug-and-Play Integration: MCP and similar protocols ensure your APIs use a common language, making it far easier for platforms like Zapier, Workato, or even OpenAI's agents to connect and coordinate without tedious custom configuration.
Smarter Automation: When your APIs are context-aware thanks to protocols like MCP, you enable workflows that adapt automatically to user needs, greatly reducing manual oversight (and the risk of errors).
Futureproof Compatibility: Think of this as equipping your API toolbox with the latest adapters, no more being left out when new integration trends or AI-powered workflows show up on the scene.
Reduced Chaos: By standardizing how data and actions are described, you avoid the confusion that comes from inconsistent endpoints or unpredictable behaviors.
Bottom line: if you want your APIs to be team players, ready to jump into any integration, workflow, or AI task at a moment's notice, embracing modern protocols like MCP will help you avoid chaos and unlock the full potential of your API collections.
Adding Tests: Debugging and Powering Your CI/CD Pipeline
Ready to catch issues before they hit production? Tests are your secret weapon. By attaching tests directly to your API requests, you can instantly verify responses, spotting errors and quirks on the fly. Think of these as little guardians that watch every API call you make.
How it works:
When setting up or editing an API request, add your test scripts right within the request configuration.
These scripts automatically check if responses meet your expectations, status codes, data structure, or anything you want to validate.
As you run requests, results are displayed immediately so you can debug quickly, perfecting your collection before anyone else tries it.
For teams with automated pipelines, it's easy to take things further. Reuse your test suite and plug it into your CI/CD with platforms like Jenkins or Travis CI. Now, every push or code change triggers your API tests, catching breaking changes right away and keeping your collection rock solid.
Pro Tip: Organize your tests for clarity. The clearer your testing logic, the faster you'll squash bugs and help your team ship with confidence.
Data Visualization: Making Sense of the Chaos
Ever looked at a massive API response and felt your eyes glaze over? Fear not, data visualization can come to your rescue! By transforming raw, complex data into charts, graphs, or other visual formats, you can identify trends, spot anomalies, and communicate information far more effectively.
Here’s why data visualization is a game-changer for API responses:
Clarity at a Glance: Instead of wading through endless JSON or XML, visualize your data as bar charts, line graphs, or heatmaps for instant understanding.
Spot Patterns and Outliers: Detect trends, highlight spikes, or catch issues in your API responses before they become big headaches.
Engage Your Audience: A well-crafted pie chart or scatter plot makes it easier to present findings to your team, or to your boss who prefers “pictures over paragraphs.”
Whether you’re using tools like Tableau or embedding custom dashboards in your workflow, a good visualization can turn a mountain of API data into actionable insights.
Documenting Your API with Markdown
Now that your collection is set up, let's talk documentation. Using Markdown, you can craft clear, user-friendly API docs that make onboarding and troubleshooting a breeze.
Markdown is a lightweight, easy-to-read syntax that's widely supported by platforms like GitHub, Bitbucket, and many developer portals. Here’s how you can put it to work:
Add Endpoint Descriptions: Write concise descriptions for each API endpoint using headers, lists, and code blocks to organize information.
Illustrate with Examples: Use fenced code blocks (
```) to show sample JSON requests and responses. Syntax highlighting makes them easy to scan.Tables for Clarity: Present parameters, response fields, and status codes with Markdown tables. No more squinting at jumbled text!
Link Out for Context: Embed helpful links to external docs or related APIs using standard Markdown link syntax.
For example, you might document an endpoint like this:
Example Response
Pre-Request Scripts: Automate Prep and Debugging
Ever wish you could set up some common logic to run before every API call, like setting authentication headers, initializing variables, or logging details for debugging? That’s where pre-request scripts shine.
A pre-request script is a snippet of code you attach to your entire collection or a specific folder. When you trigger any request inside that group, your script runs automatically, think of it as a backstage crew handling prep work before the curtain rises.
Here’s why you’ll love them:
Flexible Placement: Attach scripts at the collection level to apply everywhere, or just to a folder for more targeted control.
Powerful Automation: Automate repetitive setup tasks, catch errors early, or inject dynamic variables without rewriting code for every endpoint.
Debug Like a Pro: Add logging or temporary checks to spot issues before requests go out.
For example, if every call needs an updated timestamp or token, let your pre-request script handle it. Or, pop in some console logs to inspect variables before calling an external API. This saves you time, reduces errors, and keeps workflows tidy, no more copy-pasting setup logic into every request.
Mastering API Collections: Management and Advanced Features
Congratulations! You've created your API collection. But the journey doesn't end there. Let's explore how to manage your collections effectively and dive into some cool advanced features.
Managing API Collections
Editing Collections: Keeping Things Fresh
Your API collection isn't set in stone. As your needs evolve, so should your collection. Here's how to make changes:
Navigate to the API Platform and select your collection
Click on the collection you want to edit
From here, you can:
Add or remove endpoints
Modify endpoint configurations
Update collection details
Remember, changes can impact users of your API, so communicate updates clearly!
Configuring Settings: Fine-Tuning Your Collection
Every collection has its own personality. Let's customize it:
In your collection, head to the Settings tab
Here you'll find several options:
Collection Settings: Update version numbers and descriptions
URL Settings: Customize the base URL and path for your collection
Sharing: Control who can see and use your collection
Pro Tip: Regularly review your settings to ensure they align with your current needs and security requirements.
Sharing and Visibility Options: Playing Well with Others
API collections are often team efforts. Here's how to control who sees what:
In the Settings tab, find the Sharing section
By default, new collections are hidden from the API library
To make your collection discoverable:
Click "Show in API library"
This allows workspace members to find and request access
To restrict visibility:
Click "Hide from API library"
Only users with direct access can see the collection
Remember, visibility doesn't equal access. You still control who can use the APIs through access profiles.
Collaboration Made Easy
Collections are designed for sharing and collaboration, making teamwork a breeze. Whether you’re working with a small team or collaborating across departments, you have flexible options:
Workspace Sharing: Add collaborators directly to your workspace, letting them view or edit collections as you see fit.
Direct Links: Share a collection link for quick access, ideal for onboarding new team members or external partners.
Access Control: Assign Viewer or Editor roles to each collaborator, ensuring the right people have the right permissions.
“I recommend that everyone uses collections as they are a great way of sharing. Without collections, you'll spend time reading documentation or looking at code.”
, Michael Darmousseh,
Founder and Engineer, Extend
Many teams even include collection links in feature announcements, making it simple for developers to try out new APIs instantly.
Pro Tip: When rolling out updates or new features, include a collection link in your release notes or internal documentation. This helps your team, and external partners, get hands-on in seconds, reducing confusion and accelerating adoption.With these sharing and visibility options, you can keep your APIs secure while making collaboration smooth and efficient.
Moving Collections Between Workspaces: Seamless Collaboration
Need to shift a collection to a different workspace? No problem! The move feature lets you easily relocate your collection wherever your team needs it most.
Here's how to do it:
Go to your collection in the API Platform.
Click on the "Move" option (usually found in the collection settings menu).
Choose the target workspace, this could be a shared team space or even a group dedicated to a specific project.
Confirm the move.
That’s it! By moving collections between workspaces, you ensure everyone who needs access has it, whether they're collaborating within a department or sharing resources across your organization. This is perfect for keeping your API collections organized and available in team workspaces or even larger networks, like those used in enterprise environments.
Moving collections streamlines teamwork and keeps everyone on the same page, no more hunting for that one elusive API!
Forking Collections: Branch Out Without Breaking Things
Ever wanted to try out bold new ideas without risking everything? Forking is your safety net. When you fork a collection, you create a separate copy that you can tweak, experiment with, or enhance, all without touching the original.
This comes in handy when:
You need to develop new features in parallel, but don’t want to disrupt your stable base.
Team members want to propose changes or test new endpoints before merging into the main collection.
Think of it like making a clone of your favorite recipe. Tweak the spices, add a dash of something new, and if it’s a hit, you can always merge those tasty improvements back into the main cookbook. This way, innovation and stability can happily coexist.
Running Collections with Multiple Data Sets: One Test, Many Scenarios
Need to see how your API handles a variety of inputs without manually running every request? There's a smarter way, run your collection with a data file. This lets you test all your endpoints using different sets of values, all in one go.
Here's how to breeze through batch testing:
Prepare a data file, usually a CSV or JSON, with columns for each variable your requests need (think "userId," "email," etc.).
In your test runner, upload the data file when prompted.
Each row becomes a separate test run, with the corresponding values plugged into your requests.
This approach helps you spot issues faster, compare results across multiple scenarios, and ensure your API is truly production-ready. Great for catching those sneaky edge cases before your users do!
Pre-Request Scripts: Automate and Streamline Your Workflow
Ever wish you could automate essential setup steps before each API call? That's where pre-request scripts come in handy. These scripts let you define common tasks, such as setting authentication tokens, adding custom headers, or running debugging code, that need to run every time an API request is made.
You can add a pre-request script to an entire collection or to specific folders within your collection. Wherever you place it, the script executes right before each relevant request goes out. This not only saves you time but ensures consistency across all your API calls, no more manual copy-pasting or worrying about forgotten steps.
Think of it as setting the table before dinner: everything's in the right place, ready for a smooth dining experience. Your APIs, and your future self, will thank you!
Advanced Features
Syncing to Postman: Expand Your Reach
Want to make your APIs available beyond Workato? Sync them to Postman:
In your collection's Settings tab, find "Sync to Postman"
Connect to your Postman workspace (or create a new connection)
Choose where to store your collection in Postman
Click "Sync API collection"
Voila! Your collection is now in Postman, ready for further documentation or sharing with external developers.
2. Downloading OpenAPI Specifications: Universal Understanding
OpenAPI (formerly Swagger) is like a universal language for APIs. Here's how to get your spec:
On your API collection page, look for "Download OpenAPI spec" in the upper-right corner
Click to download the file
This file contains documentation for all endpoints in your collection
Pro Tip: Workato supports both OpenAPI 3.0 (default) and 2.0. Need the older version? Just add?oas_ver=2 to the download URL.
Why is this cool? OpenAPI specs can be used in various API tools, making your APIs more accessible and easier to integrate with other systems.
Scenario-Based Testing: Real-World API Workouts
Ever wish you could put your APIs through their paces, with real data and unpredictable outcomes? Scenario-based testing lets you do exactly that. Here’s how you can simulate real-life situations and make sure your API delivers under every circumstance:
Prepare Your Data Set
Start by creating a list of sample data that mirrors the range of inputs your API might encounter. Think customer examples, edge cases, or even wildcards a QA tester might dream up.Run Iterative Tests
Use a tool like Postman, Insomnia, or your favorite API testing suite to loop through your data set. For each entry, send a request to your API and observe the responses.Trigger Conditional Workflows
Based on the results of each test, trigger automated workflows, like updating a test database, logging failures, or sending a Slack notification for anything unexpected. This helps catch not just individual errors, but also tricky patterns across scenarios.Analyze and Refine
Review the outcome of each test run. Did your API return the correct data, status codes, or error messages? Look for trends, anomalies, or areas ripe for improvement.
Pro Tip: Sync your test scripts with GitHub or other version control tools to keep your scenarios organized and easily repeatable, your future self will thank you!
Visualizing API Response Data: Making Sense of the Noise
Ever stared at a mountain of JSON or XML and felt your eyes glaze over? You're not alone. Transforming raw API responses into digestible visuals can save you (and your teammates) plenty of headaches.
Here’s how to bring your data to life:
Charts and Graphs: Use tools like Datadog or Tableau to turn data into line charts, bar graphs, or scatterplots. Instantly spot trends, outliers, or anomalies that might be hiding in plain sight.
Dashboards: Create live dashboards in platforms like Power BI or Grafana. These can aggregate responses from multiple endpoints and paint a clear, real-time picture of your API’s impact.
Custom HTML Widgets: For DIY enthusiasts, embed your data into custom HTML panels, think tables, lists, or interactive charts using libraries like Chart.js or D3.js.
Pro Tip: Visualizations aren't just for show, they help teams debug, monitor, and present findings more effectively. Pick the style that suits your audience, whether it’s a quick bar chart or a sophisticated dashboard.
Conclusion
By mastering these management techniques and advanced features, you're not just creating API collections – you're creating a smooth, efficient API ecosystem. Your future self (and your team) will thank you for the extra effort!
Remember, the key to successful API management is regular attention and adjustment. Keep an eye on your collections, update them as needed, and don't hesitate to use these advanced features to make your life easier.
Frequently Asked Questions
What is an API collection and why is it important for managing API endpoints?
An API collection is essentially a structured grouping of related API endpoints that share common access patterns, workflows or functionality, allowing teams to organize, manage and scale their APIs more effectively. Rather than having disparate API calls scattered across various tools, an API collection brings all of those endpoints under one unified repository, whether for requests, shared variables, authorization settings or documentation. This kind of grouping matters for API management because it reduces complexity, improves visibility into your API landscape, provides a central way to control access, and helps both developers and non-developers work together more seamlessly. When you adopt API collections, you’re not just naming endpoints, you’re creating a more maintainable and secure integration platform.
How do API collections help improve collaboration between development, QA and business teams?
When development, QA and business stakeholders all need to interact with APIs, using well-defined API collections can dramatically improve collaboration. For developers, a collection ensures that all related endpoints, tests and variables are in one place with clear, reusable documentation. For QA, the collection can embed verification steps and environment variables that make it easier to test reliably. For business users or product people, the collection offers readable documentation and standardized workflows that demystify the integration layer. By enabling everyone to view, comment on and use the same API collection, you reduce duplication, streamline onboarding and increase clarity across team roles, ultimately making your API ecosystem more transparent and efficient.
What are the main components and features you typically find inside an API collection?
Inside a robust API collection you’ll usually find several key components: defined requests (the actual API endpoint calls), documentation (which describes parameters, headers and response schemas), variables (for environment-dependent values like tokens or base URLs), authorization flows (to manage credentials centrally), tests or validation scripts (to verify correct behavior), and sometimes pre-request or post-request scripts (to automate setup or teardown logic). These features combine to create a powerful toolkit for API developers. The presence of variables and pre-request scripts means you avoid hard-coding environment-specific data, while embedded tests ensure your endpoints behave as expected. Having these pieces bundled into an API collection means less guesswork, fewer manual steps and better consistency across your API integrations.
How should I choose the right type of API collection for my use case (for example proxy, recipe or AI gateway)?
Choosing the right type of API collection depends on your performance needs, degree of customization, security requirements and the integration targets you have in mind. A proxy-type collection is ideal for high-volume, straightforward operations where you simply forward requests and add monitoring or access control. A recipe-type collection gives you more flexibility: it lets you combine data sources, add custom business logic and build more advanced API workflows. Then you have AI gateway collections, which are optimized for interactions with intelligent agents, machine learning models or large-language-model integrations, adding extra safeguards for those kinds of requests. By aligning your selection, whether proxy, recipe or AI gateway, with your specific goals and architecture you ensure you’re not just organizing APIs, but optimizing for performance, security and future scale.
What best practices should I follow to structure and maintain API collections for long-term success?
Maintaining API collections for long-term success means adopting a few key best practices: define clear naming conventions and grouping rules for your endpoints so that the collection remains navigable and intuitive as it grows; use standardized data formats (such as JSON, RESTful patterns or OpenAPI schemas) to ensure consistency and ease of integration; document machine-readable contracts (via Swagger or OpenAPI) so new users or tools can quickly understand your endpoints; version your collections and endpoints (such as v1, v2) to manage change without breaking existing integrations; and integrate continuous testing and monitoring to catch regressions or performance issues early. Clear access control, reuse of data types or schemas and a culture of regular review and refactoring also help prevent API chaos and make your collections resilient, adaptive and ready for evolving workflows.
How can advanced teams leverage API collections to enable automation, intelligent agents and workflow orchestration?
Advanced teams use API collections not merely as organizational tools but as enablers of automation, intelligent-agent integration and workflow orchestration. By structuring your API endpoints into collections with defined types, descriptive metadata, and machine-readable documentation, you create an environment where agents, from bots in workflow automation platforms to AI models, can discover and use endpoints reliably. For example, you might design your API collection so that an AI gateway collection supports secure calls from an LLM or intelligent assistant; you might embed pre-request scripts and variables so that scheduled workflows can trigger sequences of API calls; and you might monitor performance and version endpoints to optimize for event-driven tasks or integration pipelines. In doing so, API collections become the backbone of your enterprise’s automation strategy, enabling smarter, more responsive, and more connected digital processes.